Blockforger Integration Documentation

Complete guide to integrating and using Blockforger

๐ŸŽจ Theme:
๐Ÿ“‹ New to Blockforger? Did someone send you a link here? For basic instructions on submitting data and filling out forms, see Help or click "For Beginners" below. The other sections are for developers and administrators who want to set up custom control panels on the site.

Table of Contents

For Beginners

๐Ÿ“ Just filling out forms? If you're a basic user who just needs to submit data, see the Help page for step-by-step instructions on using pre-filled forms.

New to Blockforger? This section provides an overview for developers and administrators who are just getting started with the platform.

What is Blockforger?

โ–ถ

Blockforger is a visual JSON editor that generates drag-and-drop interfaces for REST APIs. Think of it as Postman's cooler, more visual cousin who actually helps you build things instead of just testing them. It allows you to:

  • Build visual forms from JSON schemas
  • Create API control panels without writing frontend code
  • Manage data through a Blockly-based workspace
  • Integrate with existing APIs or use Blockforger's managed backend
Key Concepts:
  • Tenants: Separate API integrations, each with their own schemas and settings
  • Schemas: JSON Schema definitions that describe your data structures
  • Workspace: The visual Blockly editor where you build JSON structures
  • API Control Panel: The interface for configuring and sending API requests

Understanding the Workspace

โ–ถ

The Blockforger workspace uses Blockly blocks to represent JSON structures. Here's what you need to know:

Block Types:
  • Custom Objects: Your tenant's specific data types (e.g., "Pet", "Order", "Customer"). These appear in the toolbox under "Custom Objects" and can be dragged onto the workspace.
  • Text/Numeric: Basic data types like text (strings), numbers, booleans (true/false), and their array variants. These are the fundamental building blocks that contain textboxes where you type values.
  • Dynamic Types: Flexible structures like dictionaries and arrays that can hold any data.
  • Scripts: Variables and references for reusable values.
  • Native Pickers: Dedicated blocks for selecting dates and colors (found in "Text/Numeric" category).
Working with Blocks:
  • Required fields appear automatically when you create a block
  • Optional fields can be added using the dropdown at the top of each block
  • Array elements are added using the "+" button on array blocks
  • The "Current JSON" area shows the JSON representation in real-time
Note: For detailed instructions on filling out forms, see the Help page.

Next Steps for Developers

โ–ถ

As a developer or administrator, you'll want to explore these sections:

Essential Reading:
  1. Workflows & Architecture: Understand the different integration patterns (Frontend-Only, Full-Stack, Hybrid)
  2. Tenant Management: Learn how to create and configure tenants
  3. Schema Management: Discover how to add schemas via Swagger import, AI generation, or manual creation
  4. Workspace & API Control Panel: Master the interface for building and testing APIs
Advanced Topics:
๐Ÿ’ก Quick Start: The fastest way to get started is to create a tenant, add a schema, and start building. See the Setup Guide for step-by-step instructions.

Workspace & API Control Panel

The main workspace (index.html) is where you build and interact with your API control panel.

General Workflow

โ–ถ

The typical workflow in Blockforger follows two main steps:

  1. Make changes in Blockly: Use the visual workspace to build and modify your JSON structures using drag-and-drop blocks
  2. Submit, grab curl, send requests, etc. from the API Controls when done: Once your JSON is ready, open the API Control Panel (click the button to swing it out) to submit requests, grab curl commands, send API requests, or request revisions from AI Assist
๐Ÿ’ก Tip: The "Current JSON" area is located in the API Control Panel. Click the API Control Panel button to open it and see your JSON update in real-time as you make changes in the Blockly workspace.

Understanding the Workspace

โ–ถ

The workspace is a visual Blockly-based editor where you build JSON structures using drag-and-drop blocks.

Toolbox Categories:
  • Custom Objects: Your tenant's schemas (automatically loaded) - a key distinguishing factor from Postman
  • Dynamic Types: Dictionary and array blocks for flexible structures
  • Scripts: Variables and references for reusable values
  • Text/Numeric: Basic data types (text/strings, numbers, booleans) and their array variants - these contain textboxes where you enter values
  • Custom Lists: Arrays of your custom schemas
  • Custom Dictionaries: Maps with your custom schemas as values
Building JSON:
  1. Drag blocks from the toolbox onto the workspace
  2. Connect blocks to build nested structures
  3. Fill in field values (strings, numbers, etc.)
  4. Use the "+" buttons to add array items or dictionary items. Optional fields are managed via a dropdown at the top of each block
  5. Watch the "Current JSON" area update in real-time (located in the API Control Panel - click the button to swing it out)
Rebuilding from JSON:
  1. Paste JSON into the "Current JSON" textarea
  2. Optionally set the "Root Schema Type" if needed
  3. Click "๐Ÿ”—๐Ÿงฉ Rebuild link+blocks from JSON"
  4. The workspace will automatically create blocks matching your JSON structure
  5. For objects of reasonable size, this will create a shareable link
๐Ÿ’ก Important Feature: The shareable link feature allows a second party to send a third party a half-filled-out form! This is perfect for collaboration and pre-populating forms with partial data. It's like sending someone a partially completed crossword puzzle. Maybe they use the same form for everyone in the state! With a pre-built link, they can save you time.

API Control Panel

โ–ถ

The API Control Panel (right side) lets you configure and send API requests.

HTTP Methods:
  • POST: Create new items
  • GET: Retrieve items (requires path_id for single items)
  • PUT: Replace entire items (requires path_id)
  • PATCH: Partially update items (requires path_id)
  • DELETE: Remove items (requires path_id)
API Route:
  • Enter your base API endpoint URL
  • Use the endpoint selector to choose from available endpoints
  • Click the "?" button for endpoint information
Query Parameters:
  • Click "+ Add Query Parameter" to add key-value pairs
  • Useful for filtering, pagination, etc.
  • Common parameters like limit and offset are auto-added for backend-enabled tenants
Headers:
  • Add custom headers as needed
  • Use {blockforger-auth-token} for Firebase ID token
  • Use {blockforger-email} for user email
  • Authorization header is auto-added for backend-enabled tenants
Variables:
  • Define variables that can be referenced in your JSON
  • Useful for dynamic values that change between requests
  • Reference variables in blocks using the "copy" block type
Content Types:
  • JSON (application/json) - Default
  • CSV (text/csv)
  • XML (application/xml)
  • BSON (application/bson)
  • YAML (application/x-yaml)
Sending Requests:
  1. Build your JSON structure in the workspace
  2. Configure route, method, headers, and parameters
  3. Click the appropriate HTTP method button (POST, GET, etc.)
  4. View the response in the "Validations+Responses" area
Validation Errors:

Validation errors are displayed in two places for easy visibility:

  • Validations+Responses Area: Detailed validation errors appear in the "Validations+Responses" section of the API Control Panel
  • Footer Red Bubble: A clickable red bubble appears in the footer showing a summary of the validation error (e.g., "โŒ invalid choice: /gender"). Clicking it displays the full error message
๐Ÿ’ก Tip: The footer validation error bubble is always visible, even when the API Control Panel is closed. This makes it easy to spot validation issues without opening the panel.

AI Assist

โ–ถ

AI Assist transforms your current JSON using natural language instructions.

Using AI Assist:
  1. Build or load JSON in the workspace
  2. Click the "๐Ÿค– AI Assist" button
  3. Enter transformation instructions (e.g., "Convert all string fields to uppercase", "Add a timestamp field", "Remove all null values")
  4. Click "๐Ÿš€ Transform JSON"
  5. Review the transformed JSON
  6. Click "Rebuild link+blocks from JSON" to update the workspace
Note: AI Assist can be disabled per-tenant via the hide_ai_assist tenant property.

AI Preload

โ–ถ

AI Preload generates pre-filled JSON objects that comply with your existing schemas using natural language descriptions.

Using AI Preload:
  1. Navigate to assist/preload.html?tenant= (add your tenant name to the URL)
  2. Enter a description of the object you want to create in plain English
  3. Click "Generate Preloaded Object"
  4. The system will:
    • Analyze your tenant's schemas
    • Generate a JSON object matching your description
    • Validate the object against your schemas
    • Auto-detect the appropriate root schema
  5. Review the generated object (or proceed if validation warnings appear)
  6. You'll be automatically redirected to the workspace with the pre-filled JSON loaded
Example Descriptions:
  • "A first-class pilot named Jack Clark with license N326237 and 75 hours"
  • "A Boeing 737 flight from LAX to JFK"
  • "A passenger named Sarah Johnson with seat 12A"
๐Ÿ’ก Tip: AI Preload costs 500 tokens per generation. This is significantly higher than the cost of generating or using a schema normally. You can disable this feature for your end users to reduce costs via the hide_ai_preload tenant property.
Note: AI Preload can be disabled per-tenant via the hide_ai_preload tenant property. If validation issues occur, you can proceed anyway and manually fix them in the workspace.

Keyboard Navigation

โ–ถ

Blockforger supports keyboard shortcuts for efficient navigation:

  • Arrow Keys: Navigate between blocks
  • Tab: Move to next input field
  • Enter: Edit selected block
  • Delete/Backspace: Remove selected block
  • Ctrl+C / Cmd+C: Copy block
  • Ctrl+V / Cmd+V: Paste block

Workflows & Architecture

Blockforger supports multiple architectural patterns depending on your needs. Choose the workflow that best fits your use case. You can always switch your workflow later: the schemas are what enables all of them.

Frontend-Only: Import as API Client

Frontend-Only Workflow

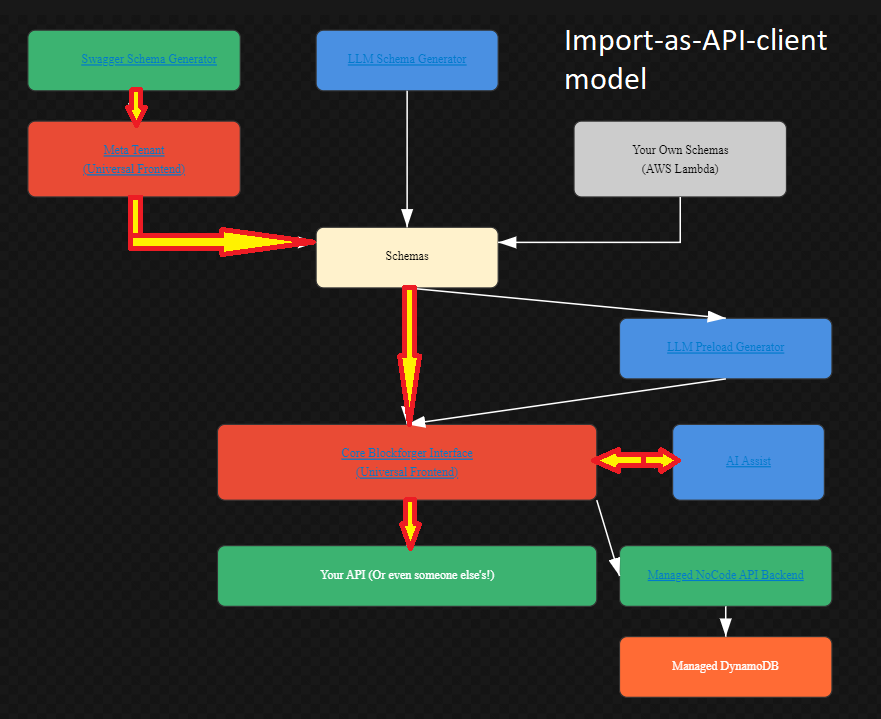
This workflow is ideal when you already have an existing API and want to build a visual control panel for it.

How It Works:

  1. Schema Generation:
    • Use the Swagger Schema Generator to import your existing API specification
    • Use the Postman Collection Import to instantly convert Postman collections
    • Or use the LLM Schema Generator to create schemas from descriptions
    • Or upload Your Own Schemas directly
  2. Schema Management:
    • All schemas are managed through the Meta Tenant (universal frontend)
    • Schemas are stored centrally and made available to the core interface
  3. Universal Frontend:
    • The Core Blockforger Interface uses your schemas to generate a drag-and-drop control panel
    • AI Assist provides real-time help and transformations
    • LLM Preload Generator can pre-fill forms with sample data
  4. API Integration:
    • The frontend connects directly to Your API (or any external API)
    • No backend hosting required - you manage your own API
    • Perfect for integrating with existing systems

Use Cases:

๐Ÿ’ก Tip: This is the simplest workflow - no backend setup required. Just import your API schema and your control panel is instantly built.

Full-Stack: Instant Backend

Full-Stack Workflow

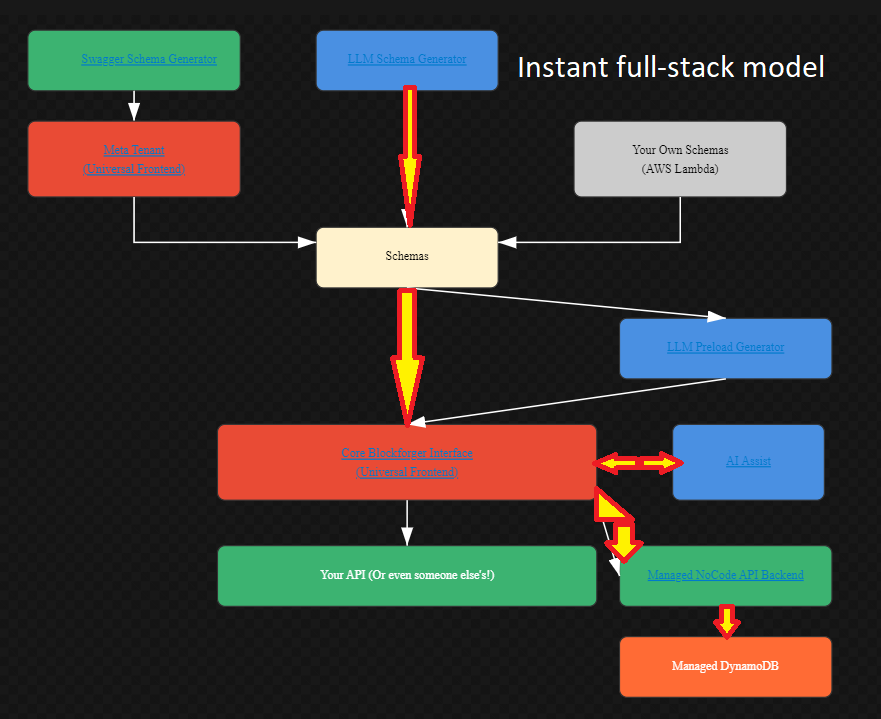
This workflow provides a complete full-stack solution with managed backend hosting and database storage.

How It Works:

  1. Schema Generation:
    • Generate schemas using Swagger, LLM, or upload your own
    • Schemas flow through the Meta Tenant for management
    • All schemas are centralized for the core interface
  2. Universal Frontend:
    • The Core Blockforger Interface provides the visual control panel
    • AI Assist offers interactive AI-powered assistance
    • LLM Preload Generator creates sample data automatically
  3. Managed Backend:
    • Enable Managed NoCode API Backend in tenant settings
    • Automatic REST API generation (POST, GET, PUT, PATCH, DELETE)
    • Built-in authorization and validation
    • No code required - fully managed by Blockforger
  4. Database Storage:
    • Data is automatically stored in Managed DynamoDB
    • Configure capacity modes (on-demand, provisioned, or auto-scaling)
    • Automatic indexing and query optimization

Use Cases:

๐Ÿ’ก Tip: Enable backend hosting by setting dynamo_backend: "true" in your tenant's backendoptions. See AWS Integrations for configuration details. It's literally one flag to get started. We told you we like to keep things simple.

Hybrid: Backend as Document Manager

Hybrid Workflow

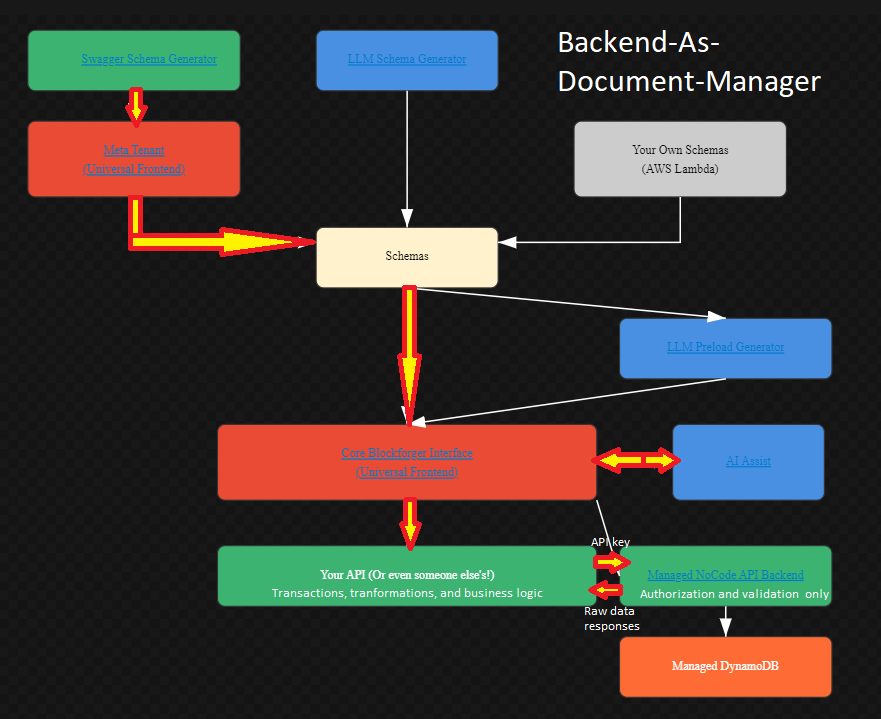
This workflow combines the managed backend with your own business logic layer, enabled by EventBridge's asynchronous I/O capabilities.

How It Works:

  1. Schema Generation:
    • Generate schemas using Swagger, LLM, or upload your own
    • Manage schemas through the Meta Tenant
    • Schemas are centralized for the universal frontend
  2. Universal Frontend:
    • The Core Blockforger Interface provides the visual control panel
    • AI Assist offers real-time transformations and help
    • LLM Preload Generator creates sample data
  3. Your Business Logic Layer:
    • Implement your own API with custom business logic
    • Handle complex operations: aggregations, joins, transformations, transactions
    • Manage workflows, validations, and business rules
    • Can be hosted anywhere (AWS Lambda, your own servers, etc.)
  4. Managed Backend (Document Manager):
    • The Managed NoCode API Backend acts as a persistence layer
    • Handles authorization and validation only
    • Stores data in Managed DynamoDB
    • Provides simple CRUD operations
  5. EventBridge Integration (Key Feature):
    • EventBridge provides asynchronous I/O between your API and the managed backend
    • Instead of waiting for synchronous API responses, events are published asynchronously
    • Your API can process events in the background
    • Enables complex workflows without blocking the frontend

The Hybrid Flow:

The hybrid model uses EventBridge for asynchronous I/O, allowing your API to implement complex business logic while the managed backend handles persistence:

  1. Frontend โ†’ Your API: The universal frontend sends requests to your custom API
  2. Your API โ†’ EventBridge (input): Your API performs additional business logic and publishes events to the persistence layer via EventBridge
  3. EventBridge (input) โ†’ Managed No-code Backend: Events are received by the managed backend, which performs authorization and validation, then persists data to DynamoDB
  4. Managed No-code Backend โ†’ EventBridge (output): The managed backend publishes events containing the results of what the persistence layer actually completed
  5. EventBridge (output) โ†’ Your API: Your API receives events asynchronously for any additional metrics, state maintenance, and processing to reflect successful persistence changes
  6. Your API โ†’ Frontend: Your API can respond immediately (fire-and-forget) or wait for confirmation events

Benefits of Asynchronous I/O:

Example Use Cases:

Configuration:

To enable the hybrid workflow:

  1. Enable dynamo_backend: "true" in your tenant's backendoptions
  2. Configure eventbridge-output to publish events from the managed backend
  3. Configure eventbridge-input: "true" to receive events in your API
  4. Set up EventBridge rules to route events to your API (Lambda, SQS, etc.)
  5. Create API keys for your custom API to authenticate with the managed backend
๐Ÿ’ก Tip: The hybrid model gives you the best of both worlds: a managed persistence layer with the flexibility to implement complex business logic. EventBridge's asynchronous I/O is the key enabler that makes this pattern work efficiently.
Note: See the AWS Integrations section for detailed EventBridge configuration instructions.

Setup Guide

This section is for administrators and developers who want to set up their own Blockforger integration. If you're just using someone else's form, see the For Beginners section above or the Help page. No judgment - sometimes you just need to fill out a form, and that's totally fine. But if you're here, you're probably ready to build something cool.

Quick Start for Administrators

โ–ถ
  1. Sign in: Use Firebase social login (Google, etc.) to authenticate - no account creation needed
  2. Register your first tenant: Visit user/register.html (easiest) or use the meta tenant (second easiest) to register a new tenant
  3. Add schemas: Import from Swagger, generate with AI, or create manually
  4. Start building: Use the main workspace and your control panel is instantly built

For detailed walkthroughs, see the sections below.

๐Ÿ’ก Tip: Check out the prospect page for an overview of Blockforger's capabilities, or the efficiency page for data entry workflows.

Tenant Management

A tenant in Blockforger represents a separate API integration. Each tenant has its own schemas, settings, and permissions. Think of tenants as separate apartments in a building - they share the same infrastructure, but each has their own space, rules, and keys.

The Meta Tenant

โ–ถ

The Meta Tenant (index.html?tenant=meta) is the central hub for directly managing all tenant configurations. This is where you can modify existing tenants and register new ones. It's like the building manager's office.

What is the Meta Tenant?

The meta tenant workspace is a special workspace where the root schema is always configuretenant. From here, you can:

  • Modify existing tenants: Update tenant properties, schemas, and configurations
  • Register new tenants: Create a new tenant by using a new extension value in the tenant object
  • Manage all tenant aspects: Configure schemas, tenant properties, backend options, and more
Tenant Object Structure

The tenant object (see tenant.json schema) contains all tenant configuration:

  • extension: The tenant identifier/name (required) - use a new extension to register a new tenant
  • properties: Tenant-specific properties (subobject - see tenantproperties.json)
  • schema: Array of JSON schema strings for the tenant (required)
  • endpoints: Array of loose endpoints not attached to specific schemas
  • endpointDescriptions: Descriptions for the endpoints
๐Ÿ’ก Key Point: Both properties (tenant properties) and schema (schemas) are subobjects of the tenant object. This means nearly all tenant configuration options can be managed from the meta tenant workspace by working with the tenant object structure.
Using the Meta Tenant
  1. Navigate to index.html?tenant=meta
  2. The workspace will load with configuretenant as the root schema
  3. To modify an existing tenant:
    • Set type to "json" (this is the default value)
    • Add the body property (this will be a tenant schema)
    • Set the extension field to the tenant you want to modify
    • Modify the properties or schema subobjects as needed
    • Submit using POST (note: in the meta tenant, the POST button is overridden to say "Update config+schemas")
  4. To register a new tenant:
    • Set type to "register" (or set it to "json" to configure schemas simultaneously)
    • Add the body property (this will be a tenant schema)
    • Set the extension field to a new, unique tenant name
    • Configure the properties and schema subobjects
    • Submit using POST (note: in the meta tenant, the POST button is overridden to say "Update config+schemas")
Note: The meta tenant is the primary interface for tenant management. All tenant modifications and registrations can be performed here by manipulating the tenant object structure. See the sections below for specific use cases.

Creating a New Tenant

โ–ถ

There are multiple ways to create a new tenant:

Method 1: Using register.html (Easiest)
  1. Navigate to user/register.html
  2. Enter your tenant name(s) in the form
  3. Submit to register your tenant(s)
Method 2: Using the Meta Tenant (Second Easiest)
  1. Navigate to index.html?tenant=meta
  2. In the meta tenant workspace, the root schema is always configuretenant
  3. Set the type field to "register" (or set it to "json" to configure schemas simultaneously)
  4. Add the body property to your configuretenant using the dropdown at the top of the block (this will be a tenant schema)
  5. Configure properties within the body (tenant) block (see Tenant Settings below)
  6. Use the dropdown at the top of the body block to add optional properties like backendoptions or pagecustomizations
  7. Submit the request using the POST button in the API Controls panel (note: in the meta tenant, this button is overridden to say "Update config+schemas")
Method 3: Programmatic Creation

You can also create tenants programmatically via the API or through the billing page.

Note: Tenant names must be alphanumeric (with underscores allowed). They are case-insensitive and will be converted to lowercase.

Tenant Settings

โ–ถ

Tenant settings can be configured in two ways:

Method 1: Via Meta Tenant UI
  1. Go to index.html?tenant=meta
  2. In the meta tenant workspace, the root schema is always configuretenant
  3. Add properties to your configuretenant block using the dropdown at the top of the block to add optional fields
  4. Add the body property to your configuretenant (this will be a tenant schema)
  5. Within the body (tenant), add properties like:
    • route: Base API endpoint URL
    • authorized_reads: Require authentication for reads (true/false)
    • authenticated_reads: Require Google OAuth for reads (true/false)
    • hide_ai_assist: Hide AI Assist feature (true/false)
    • hide_ai_preload: Hide AI Preload feature (true/false)
    • graphql_query_mode: Enable GraphQL query mode - converts JSON blocks to GraphQL query format (true/false)
    • topic: Topic for the tenant's root block
    • presentation: URL to presentation layer
  6. Use the dropdown at the top of the body block to add optional properties like backendoptions or pagecustomizations
  7. Submit using POST
Method 2: Raw Textbox Editing
  1. Navigate to your tenant's workspace
  2. Click the "Rebuild link+blocks from JSON" button
  3. Edit the JSON directly in the "Current JSON" textarea
  4. Click "Rebuild link+blocks from JSON" again to update the workspace
  5. Submit changes with POST
๐Ÿ’ก Tip: The backendoptions property contains advanced settings for DynamoDB, S3, and EventBridge. See AWS Integrations for details.

Deleting a Tenant

โ–ถ

To delete a tenant (requires admin permissions):

  1. Go to tenant/schemamgmt.html
  2. Select the tenant you want to delete
  3. Confirm deletion
โš ๏ธ Warning: Deleting a tenant permanently removes all schemas, data, and configurations. This action cannot be undone.

Schema Management

Schemas define the structure of your API data. Blockforger supports multiple ways to create and manage schemas.

Adding Schemas to a Tenant

โ–ถ

There are four main ways to add schemas:

1. Import from Swagger/OpenAPI, Postman, or GraphQL
  1. Go to assist/swagger.html for Swagger/Postman OR assist/graphql.html for GraphQL
  2. Paste your API definition (Swagger/OpenAPI JSON, Postman Collection JSON, or GraphQL SDL)
  3. Click the process button
  4. Review the generated schemas
  5. Upload to your tenant

See Importing from Swagger, Importing from Postman, or Importing from GraphQL for detailed instructions.

Note: Schema generation tools are for adding schemas to an already-existing tenant configuration. To register a new tenant, use register.html (easiest) or the meta tenant (second easiest).
2. Generate with AI
  1. Go to assist/schemagen.html?tenant= (add your tenant name to the URL)
  2. Describe your data model in plain English
  3. Review and refine the generated schemas
  4. Upload to your tenant

See AI Schema Generation for detailed instructions.

Note: Schema generation is for adding schemas to an already-existing tenant configuration. To register a new tenant, use register.html (easiest) or the meta tenant (second easiest).
3. Create Manually
  1. Navigate to your tenant's workspace (index.html)
  2. Use the toolbox to build jsonschema.json structures
  3. Define properties, types, and relationships
  4. Submit using POST
4. Schema Discovery
  1. Navigate to your tenant's workspace (index.html)
  2. Build your data structure using dictionary or dynarray root blocks
  3. Fill in sample data with the structure you want to discover
  4. Click the "๐Ÿ” Schema Discovery" button in the API Control Panel
  5. Review the automatically generated schemas
  6. Submit to add the discovered schemas to your tenant

See Schema Discovery for detailed instructions.

Importing from Swagger

โ–ถ

Blockforger can convert Swagger 2.0 and OpenAPI 3.0 specifications into JSON schemas.

๐Ÿ’ก Important: In fact, Blockforger's format, when stripped of some details, is 100% backwards compatible with base JSON Schema! This means you can use standard JSON Schema tools and validators with Blockforger schemas.
Steps:
  1. Navigate to assist/swagger.html
  2. Paste your Swagger/OpenAPI JSON definition in the textarea
  3. Click "Process Swagger"
  4. The tool will:
    • Extract all schema definitions
    • Convert them to JSON Schema format
    • Map endpoints to schemas
    • Generate endpoint descriptions
    • Automatically assign other necessary fields
  5. Review the generated schemas in the output section
  6. Upload to your tenant using the integration button
// Example: Swagger 2.0 structure { "swagger": "2.0", "paths": { "/pets": { "post": { "requestBody": { "schema": { "$ref": "#/definitions/Pet" } } } } }, "definitions": { "Pet": { "type": "object", "properties": { "name": {"type": "string"} } } } }
Note: The Swagger importer automatically handles:
  • Schema references ($ref)
  • Nested objects and arrays
  • Endpoint-to-schema mapping
  • Request/response schemas

AI Schema Generation

โ–ถ

Blockforger uses AI to generate JSON schemas from plain English descriptions.

Steps:
  1. Navigate to assist/schemagen.html?tenant= (add your tenant name to the URL)
  2. Enter one or more schema descriptions in plain English
  3. Click "Generate Schemas"
  4. Review the generated schemas (preview mode doesn't upload)
  5. Refine descriptions if needed and regenerate
  6. Upload to your tenant
Note: Schema generation is for adding schemas to an already-existing tenant configuration. To register a new tenant, use register.html (easiest) or the meta tenant (second easiest).
Example Description:
A task management system with tasks that have: - Title (required string) - Description (optional string) - Due date (required date) - Assignee (user object) - Status: todo, in-progress, or done (required choice) - Subtasks (array of task objects) - Priority: low, medium, high (optional choice) Users have: - Name (required string) - Email (required, must be valid email format) - Role: admin, member, viewer (optional choice)

The AI will automatically:

  • Create separate schemas for related objects (task.json, user.json)
  • Use $ref for object references
  • Add proper validation (email format, choices, required fields)
  • Set appropriate color values for visual representation
  • Handle nested structures correctly
  • Support for returning arrays and maps of custom schema types
๐Ÿ’ก Tip: AI generation costs 500 tokens per schema. This is significantly higher than the cost of generating or using a schema normally. You can disable this feature for your end users to reduce costs. Use preview mode to refine descriptions before uploading, but you can always replace them later by reuploading with the same schema id.

Importing from Postman

โ–ถ

Blockforger can now import Postman Collections (v2.1) directly, stripping out variables and test scripts to create clean, usable schemas.

Steps:
  1. Export your collection from Postman as JSON (v2.1 recommended)
  2. Navigate to assist/swagger.html
  3. Paste the raw JSON content into the textarea
  4. The system automatically detects that it is a Postman collection
  5. Click "Process Swagger" (the button handles both formats)
  6. Review the generated schemas and upload to your tenant
๐Ÿ’ก Feature: The importer automatically extracts the request body structure and converts it into a compatible JSON Schema. It handles nested objects and arrays, ensuring your API structure is preserved.

Importing from GraphQL

โ–ถ

Blockforger can import GraphQL Schema Definition Language (SDL) and convert it to JSON schemas for use with GraphQL query mode.

Steps:
  1. Navigate to assist/graphql.html
  2. Paste your GraphQL schema definition in SDL format
  3. Click "Process GraphQL"
  4. The tool will:
    • Extract all type definitions
    • Convert GraphQL types to JSON Schema format
    • Handle required fields (marked with !)
    • Convert arrays (marked with [])
    • Map GraphQL scalar types (ID, String, Int, Float, Boolean) to JSON Schema types
    • Automatically enable graphql_query_mode in tenant properties
  5. Review the generated schemas in the output section
  6. Upload to your tenant - you'll be redirected to the meta tenant to review and submit
// Example: GraphQL Schema Definition Language type Person { id: ID! name: String! age: Int } type Query { people: [Person] person(id: ID!): Person } type Mutation { addPerson(id: ID!, name: String!, age: Int): Person }
๐Ÿ’ก GraphQL Query Mode: When importing from GraphQL, the importer automatically sets graphql_query_mode: "true" in your tenant properties. This enables GraphQL query generation from blocks, where only ID fields (fields with GraphQL type ID) are required and all other fields are optional for queries. The system automatically converts your Blockly blocks into GraphQL query strings and wraps them in the {"query": "..."} format for POST requests.
Note: The GraphQL importer:
  • Only processes type definitions (skips Query and Mutation types)
  • Converts required fields (with !) - but in GraphQL query mode, only ID fields are required
  • Handles arrays with [] syntax
  • Maps GraphQL scalar types to JSON Schema types
  • Creates $ref references for custom types
โš ๏ธ Important: GraphQL import is designed for query-only operations. Mutations are not supported. After importing, you can use the GraphQL query mode to build queries visually and send them to your GraphQL endpoint.
How GraphQL Query Mode Works:
  1. Schema Conversion: GraphQL types are converted to JSON Schema format, with ID fields (GraphQL type ID) marked as required in the schema
  2. Block Generation: Only ID fields appear as required blocks - all other fields are optional and can be added via the dropdown
  3. Query Generation: When you build blocks, the system automatically converts them to GraphQL query strings:
    • ID fields become query arguments (e.g., country(code: "US"))
    • Other fields become selection fields in the query
    • For arrays, the system generates filter queries (e.g., countries(filter: { code: { in: ["US", "CA"] } }))
  4. Request Formatting: The GraphQL query string is wrapped in {"query": "..."} format for POST requests
  5. Response Processing: GraphQL responses are automatically unwrapped (extracting the data field) and can be loaded back into blocks with auto-reload enabled
Configuring GraphQL Query Mode:

To enable GraphQL query mode for an existing tenant:

  1. Go to index.html?tenant=meta
  2. In the meta tenant workspace, add the body property to your configuretenant block
  3. Within the body (tenant) block, add the properties property
  4. Set graphql_query_mode: "true" in the properties
  5. Set route to your GraphQL endpoint URL (e.g., https://countries.trevorblades.com/)
  6. Submit with POST

Schema Discovery

โ–ถ

Schema Discovery automatically generates JSON schemas by analyzing existing data structures in your workspace. This is perfect when you have sample data and want to create schemas that match its structure.

โš ๏ธ Requirements:
  • Write Access Required: Schema Discovery requires write permissions to the tenant, as it uploads schemas after your approval.
  • Dynamic Root Type Required: Your root block must be either a dictionary or dynarray (dynamic type array). The Schema Discovery button will only appear when these conditions are met.
How It Works:

Schema Discovery analyzes the data in your workspace and automatically:

  • Infers data types (string, number, boolean, object, array)
  • Attempts to detect formats (email, UUID, date-time, URI, IPv4, etc.) based on field names and values for text/numeric fields
  • Identifies nested objects and creates separate schemas for them
  • Handles arrays and discovers schemas for array elements
  • Marks all properties as required (for dictionary roots) or analyzes patterns (for dynarray roots)
  • Generates unique schema names to avoid conflicts
  • If you have feedback on missed/wrong format detections, please let us know via email!
Steps:
  1. Navigate to your tenant's workspace (index.html)
  2. Set your root block to either:
    • Dictionary: Creates a single schema from the dictionary structure
    • Dynarray: Creates schemas for each unique object type found in the array
  3. Build your data structure with sample data that represents the structure you want to discover
  4. Fill in example values - the discovery process will analyze these to infer types and formats
  5. Click the "๐Ÿ” Schema Discovery" button in the API Control Panel (requires write permissions)
  6. Confirm the warning (this will redirect you to the meta tenant to review schemas)
  7. Review the automatically generated schemas in the meta tenant workspace
  8. Edit schema names and properties as needed (they default to "changeme1", "changeme2", etc.)
  9. Submit using POST to add the discovered schemas to your tenant
Format Detection:

Schema Discovery automatically detects formats based on field names and values:

  • email: Fields named "email", "emailAddress", etc.
  • uuid: Fields named "id", "uuid", "elementId", etc.
  • date-time: Fields with "date", "datetime", "dateUtc" in the name
  • date: Fields with "date" in the name (if not date-time)
  • uri: Fields with "url", "uri" in the name
  • ipv4: Fields named "ip", "ipAddress", etc.
  • time: Fields with "time" in the name
  • password: Fields with "password" or "pass" in the name
  • color-hue: Color values as hue (0-360)
  • color-hex: Color values as hex codes
Dictionary vs Dynarray:
  • Dictionary Root: Creates a single schema representing the dictionary structure. All properties are marked as required. Nested objects are discovered as separate schemas.
  • Dynarray Root: Analyzes all items in the array and creates schemas for each unique object type found. Useful when you have heterogeneous data with different structures.
๐Ÿ’ก Tip: Schema Discovery is perfect when you have sample JSON data from an API response or existing system. Just paste it into the workspace, rebuild blocks from JSON, and let Schema Discovery create the schemas automatically. It's like reverse-engineering your data structure.
โš ๏ธ Warning: Schema Discovery will redirect you away from your current workspace and you may lose unsaved data. The discovered schemas will be loaded in the meta tenant workspace where you can review and submit them. You may be able to recover your original data using the browser's back button.
Note: The Schema Discovery button only appears when you have write access to the tenant and your root block is a dictionary or dynarray. Discovered schema names default to "changeme1", "changeme2", etc. - remember to update them to meaningful names before submitting.

Managing and Deleting Schemas

โ–ถ

To manage schemas for a tenant:

Viewing Schemas
  1. Go to tenant/schemamgmt.html
  2. Select your tenant from the dropdown
  3. View the list of all schemas
Deleting Schemas
  1. Go to tenant/schemamgmt.html
  2. Select your tenant
  3. Click the delete button next to the schema you want to remove
  4. Confirm deletion
โš ๏ธ Warning: Deleting a schema that is referenced by other schemas may cause errors. Check for $ref dependencies before deleting. It's like pulling a Jenga block - make sure nothing else is depending on it, or things might come crashing down.
Editing Schemas
  1. Navigate to your tenant's workspace, or click the "Edit" button next to the schema you want to edit on
  2. Use the workspace to modify schema structures
  3. Submit changes with POST

Authentication & Permissions

Blockforger uses Firebase Authentication and supports granular permission management.

User Authentication

โ–ถ

Blockforger uses Firebase Authentication for user authentication. Users are automatically registered through social login - no account creation step is required.

Authentication Process:
  1. Click the "Login" button in the top navigation
  2. Sign in with your Google account via Firebase Authentication
  3. No account registration needed - users are automatically authenticated through social login
  4. Your Firebase ID token is stored locally
  5. The token is automatically included in API requests
๐Ÿ’ก Tip: Tokens expire after 1 hour. The system automatically refreshes tokens when needed. Users are already "registered" through Firebase social login - register.html is for registering tenants, not user accounts.

Managing User Permissions

โ–ถ

Permissions control what users can do within a tenant.

Permission Levels:
  • read: Can view schemas and data, but cannot modify
  • write: Can create, update, and delete data (includes read)
  • admin: Full access including schema management and tenant settings (includes read and write)
Managing Permissions:
  1. Go to tenant/admin.html
  2. Select your tenant
  3. View current users and their permissions
  4. Add new users or modify existing permissions
Schema-Level Permissions:

Individual schemas can have their own permission requirements via the permsLevel property:

  • Set permsLevel: "read" for read-only schemas
  • Set permsLevel: "write" for schemas requiring write access
  • Set permsLevel: "admin" for admin-only schemas

API Keys

โ–ถ

API keys allow programmatic access to Blockforger APIs without user authentication.

Creating API Keys:
  1. Go to tenant/admin.html
  2. Select your tenant
  3. Click "Create API Key"
  4. Select permissions:
    • user_management: Allows managing user permissions
    • backend_calls: Allows calling backend Lambda endpoints
  5. Copy and securely store the generated API key
Using API Keys:

Include the API key in the Authorization header:

Authorization: Bearer YOUR_API_KEY
๐Ÿ’ก Authorization Model: Blockforger doesn't directly use scopes inside tokens. Instead, we use a lightweight authorization module in our Lambda function that handles permission checks via DynamoDB. This provides flexible, tenant-specific permission management without relying on token scopes.
โš ๏ธ Warning: API keys have full access according to their permissions. Keep them secure and rotate regularly. Treat them like passwords, because that's basically what they are. If someone gets your API key, they can do whatever your permissions allow. Don't commit them to GitHub. Seriously. We've seen it happen.

AWS Integrations

Blockforger integrates with AWS services for backend hosting, storage, and event-driven architecture.

DynamoDB Backend Hosting

โ–ถ

Enable backend hosting to get a fully functional REST API backed by DynamoDB.

Enabling Backend Hosting:
  1. Go to index.html?tenant=meta
  2. In the meta tenant workspace, the root schema is always configuretenant
  3. Add the body property to your configuretenant (this will be a tenant schema)
  4. Add properties to your body (tenant) block, including authorized_reads: "true" (recommended for security - users get billed for API calls)
  5. Use the "+" button on the body block to add the optional backendoptions property
  6. Within backendoptions, set dynamo_backend: "true"
  7. Submit with POST
๐Ÿ’ก Tip: Backend hosting costs 10 tokens per API request. The API will be available at https://backend.blockforger.zanzalaz.com/{tenant}/{schema}. That's less than a penny per request at current token rates.
DynamoDB Capacity Modes:
On-Demand (Default):
  • No capacity planning required
  • Pay per request
  • Note: On-demand is slower than provisioned capacity because there is no standing infrastructure to serve backend requests. Infrastructure is stood up ephemerally to serve requests and then goes away again (think of it as a pop-up restaurant vs. a permanent one - the pop-up takes longer to set up, but you don't pay rent when it's closed)
  • Set dynamodb_provisioned_read: 0 and dynamodb_provisioned_write: 0
Provisioned Capacity:
  • Fixed read and write capacity units
  • Set dynamodb_provisioned_read and dynamodb_provisioned_write to desired values
  • Billed daily: 700 tokens/RCU/day (~7ยข), 2000 tokens/WCU/day (~20ยข)
  • Example: dynamodb_provisioned_read: 5, dynamodb_provisioned_write: 2
Auto-Scaling:
  • Automatically adjusts capacity based on usage
  • Configure dynamodb_autoscale_read and dynamodb_autoscale_write
  • Set min/max capacity and target utilization
  • Example configuration:
    { "dynamodb_provisioned_read": 5, "dynamodb_autoscale_read": { "min_capacity": 2, "max_capacity": 20, "target_utilization": 70 } }
Note: Auto-scaling only applies when provisioned capacity is enabled (non-zero values).

EventBridge Configuration

โ–ถ

EventBridge allows you to publish events when data changes in your backend.

EventBridge Output (Publishing Events):
  1. Go to index.html?tenant=meta
  2. In the meta tenant workspace, the root schema is always configuretenant
  3. Add the body property to your configuretenant (this will be a tenant schema)
  4. Add properties to your body (tenant) block
  5. Use the "+" button on the body block to add the optional backendoptions property
  6. Within backendoptions, configure eventbridge-output array with event configurations:
    { "eventbridge-output": [ { "eventbridge_arn": "arn:aws:events:us-east-1:720291373173:event-bus/default", "source": "blockforger-output", "detail_type": "petstore.POST", "operations": ["POST", "PUT", "PATCH", "DELETE"], "schema_names": ["pet", "order"] } ] }
  7. Configuration options:
    • eventbridge_arn: ARN of the EventBridge bus (can be in another AWS account if authorized)
    • source: Event source identifier (default: "blockforger-output")
    • detail_type: Event detail type (default: "{schema_id}.{operation}")
    • operations: Which operations trigger events (POST, PUT, PATCH, DELETE)
    • schema_names: Optional filter for which schemas trigger events
  8. Submit with POST
EventBridge Input (Receiving Events):
  1. In backendoptions, set eventbridge-input: "true"
  2. Events with source "blockforger-input" will be processed
  3. Events are billed normally (10 tokens per request)
๐Ÿ’ก Tip: You can configure multiple EventBridge outputs. Configurations are evaluated in order, and events are published to all matching rules. Logging, analytics, audit stream, replication rules. There's room for everything.

S3 Integration

โ–ถ

Blockforger can write data to S3 in CSV or timestamped JSON formats.

CSV Output:
  1. In backendoptions, set s3-csv-location to your S3 path (e.g., "s3://bucket/prefix/")
  2. Optionally configure:
    • s3-csv-optimize: "append" (fast writes) or "query" (sorted binary search)
    • s3-csv-groupby: Group CSV files by field values per schema
Timestamped JSON Output:
  1. In backendoptions, set s3-timestamped-location to your S3 path
  2. Each write operation creates a timestamped JSON file
  3. Useful for audit logs and data archival

Testing

Blockforger includes built-in testing capabilities for your APIs.

Postman Testing

โ–ถ

Blockforger can import and run Postman test suites for your APIs with full backwards-compatibility with Postman.

Using Postman Tests:
  1. Create a Postman collection for your tenant and export it as JSON
  2. Navigate to your tenant's workspace and click the "๐Ÿ“Š Test" button in the API Controls panel
  3. Paste your Postman collection JSON into the import textbox
  4. Click "Load Collection" to load the tests
  5. Run individual tests or the entire suite and view results
โš ๏ธ Note: Test collections must be pasted manually each time you want to run tests. Full SaaS support for persisting test collections is not yet available. The petstore example tenant has a pre-loaded test file for demonstration purposes.

Validation

โ–ถ

Blockforger provides real-time schema validation.

Automatic Validation:
  • JSON is validated against schemas as you build
  • Validation errors appear in the "Validations+Responses" area
  • Required fields are checked
  • Type mismatches are detected
  • Format validation (emails, patterns, etc.) runs automatically
Validation Errors:

Validation errors are displayed in two places for easy visibility:

  • Validations+Responses Area: Detailed validation errors appear in the "Validations+Responses" section of the API Control Panel
  • Footer Red Bubble: A clickable red bubble appears in the footer showing a summary of the validation error (e.g., "โŒ invalid choice: /gender"). Clicking it displays the full error message in an alert dialog
๐Ÿ’ก Tip: The footer validation error bubble is always visible, even when the API Control Panel is closed. This makes it easy to spot validation issues without opening the panel.

Customization

Customize the appearance and behavior of your Blockforger interface.

Site Theme

โ–ถ

Change the overall site theme to match your preferences.

Available Themes:
  • Vulcan: Dark theme with red accents (default)
  • Galactic: Space-inspired dark theme
  • Aurora: Colorful gradient theme
  • Neon: Bright neon colors
Changing Theme:
  1. Look for the "๐ŸŽจ Site Theme" selector (usually in the header or workspace area)
  2. Select your preferred theme
  3. The theme is saved to localStorage and persists across sessions
Note: Site theme affects the overall page appearance. Block theme (for the workspace blocks) can be changed separately. You can mix and match - maybe you want a dark site theme but colorful blocks? Go for it. We're not here to judge your aesthetic choices.

Block Theme

โ–ถ

Customize the appearance of blocks in the workspace.

Available Block Themes:
  • Dark: Dark blocks with high contrast
  • Slate: Gray-toned blocks
  • Classic: Traditional Blockly appearance
  • Colorblind (Wong): Accessible color palette
  • Colorblind (Tol): Alternative accessible palette
  • Vulcan, Galactic, Aurora, Neon: Match site themes
  • Sunset, Sunrise: Warm color themes
  • Rounded (Scratch): Scratch-style rounded blocks
Changing Block Theme:
  1. Look for the "๐Ÿงฉ Blocks Theme" selector in the workspace
  2. Select your preferred theme
  3. Blocks update immediately

Page Customizations

โ–ถ

Customize page behavior via tenant properties.

Available Customizations:
  • hide_ai_assist: Hide AI Assist feature
  • hide_ai_preload: Hide AI Preload feature
  • graphql_query_mode: Enable GraphQL query mode - converts JSON blocks to GraphQL query format
  • authorized_reads: Require authentication for reads
  • authenticated_reads: Require Google OAuth for reads
  • presentation: Link to presentation layer
  • topic: Set topic for root block

Configure these via the Tenant Settings section.

API Reference

Complete API documentation is available in Swagger format.

API Documentation

โ–ถ

View the complete API reference:

View API Docs โ†’

The API documentation includes:

  • All available endpoints
  • Request/response schemas
  • Authentication requirements
  • Example requests and responses
  • Error codes and messages

Technical Deep Dive Video

โ–ถ

Technical Deep Dive Video

Video will be embedded here

Check back soon for a comprehensive technical walkthrough

Additional Resources

Related Pages

โ–ถ

Explore these related pages for more information: